2019年6月24日 星期一

在Blender裡製作可多選的按鍵UI

在Blender裡製作可多選的按鍵UI

前言

  最近想再匯出模組的工具裡新增可以過濾物件的選項,它跟一般的UI不太一樣,這個UI必須可以"多選"而非"單選",就像Blender自帶的FBX匯出一樣,如下圖
Blender的可多選的按鍵UI

在實作後卡了一陣子,在此把學習的過程做個紀錄。

內容

  在Export時新增UI,可以參照在Blender的script裡使用FileBrowser選取檔案,這裡就說明關鍵的部分,如下
type = EnumProperty(
  name="Example Enum",
  description="Choose between two items",
  items=(
    ('OPT_A', "First Option", "Description one"),
    ('OPT_B', "Second Option", "Description two")
  ),
  default='OPT_A',
)

如果照著範例打會呈現以下
只能單選的按鍵UI
這樣的UI會變成只能"單選",本以為Blender會另外建立一種Property來解決,但google後找不到相關的文章(可能我的關鍵字沒下好)。在想了一陣子後想到Blender的FBX匯出就有一個這樣的UI,就去翻了一下該外掛的原始碼,就知道是如何做的,範例如下
type = EnumProperty(
  name="Example Enum",
  description="Choose between two items",
  options={'ENUM_FLAG'},
  items=(
    ('OPT_A', "First Option", "Description one"),
    ('OPT_B', "Second Option", "Description two")
  ),
  default={'OPT_A','OPT_B'},
)

可以看到要對"options"設定參數,並且要注意預設值的部分不再是string,而是一個dictionary,改完後就可以多選了。

參考資料

Blender Documentation Contents

相關文章

在Blender的script裡使用FileBrowser選取檔案

2019年6月17日 星期一

初探Vue.js的emit

初探Vue.js的emit

前言

  最近用Vue.js的時候需要在Child component取得Parent component,但查了一下發現Vue.js不允許取得Parent component,要透過emit來溝通,在此把學習過程做個紀錄。

內容

  由於第一次使用emit在treeview,所以範例會像treeview,範例如下
html的部分
<!DOCTYPE html>
<html>
<head>
  <meta charset="utf-8">
  <meta name="viewport" content="width=device-width">
  <title>JS Bin</title>
</head>
<body>
<script src="https://cdnjs.cloudflare.com/ajax/libs/vue/2.0.3/vue.js"></script>
<div id="app">
  <parent :nodelist="nodelist"></parent>
</div>
</body>
</html>

javascript的部分
Vue.component('child',{
  props:['node'],
  template:[
    '<ul>\n',
    '  {{node.name}}<input type="button" value="emit" @click="onClick">\n',
    '  <child v-for="childnode in node.childNodeList" :node="childnode" @evt-emit="onEmit"></child>\n',
    '</ul>\n',
  ].join(''),
  methods:{
    onClick:function(){
      this.$emit('evt-emit',this.node);
    },
    onEmit:function(node){
      console.log("recv emit node:"+node.name+" recv node:"+this.node.name);
      //emit to parent
      this.$emit('evt-emit',node)
    }
  }
});
//
Vue.component('parent',{
  props:['nodelist'],
  template:[
    '<div><child v-for="node in nodelist" :node="node" @evt-emit="onEmit"></child></div>'
  ].join(''),
  methods:{
    onEmit:function(node){
      console.log('recv by parent component');
    }
  }
  
});
let ctrlObj = new Vue({
  el:"#app",
  data:function(){
    return {
      nodelist:[
        {
          name:'node1',
          childNodeList:[
            {
              name:'node3',
              childNodeList:[
                {
                  name:'node4',
                  childNodeList:[]
                }
              ]
            }
          ]
        },
        {
          name:'node2',
          childNodeList:[]
        }
      ]
    };
  }
});
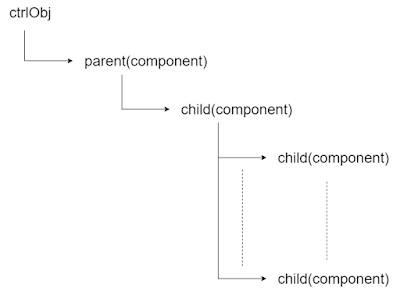
整體的component關係如下圖
Component的關係圖
執行畫面
範例的執行畫面

範例會在Child component的按鍵click使用emit,emit有點類似發送事件,但要注意第一個變數是一個字串(範例為"evt-emit"),這個變數"不能用任何的大寫"!第一用時在這點上卡了不少的時間,第2個變數就可以自己選擇要傳送的資料來傳入,範例會傳入node的資料。emit後事如何接收的呢?在component的template裡可以看到"@evt-emit="onEmit"","evt-emit"就是第一個參數的名稱,後方可填上method來接收,範例的接收為"onEmit",在Child component裡的"onEmit"可以看到顯示資訊後又再一次執行emit,這個步驟是為了可以傳到最上層的component,如果不執行的話,emit只會傳給上一層的component而已,如範例中在node4執行emit且不再執行emit的話,就只剩下node3可以接收到,要注意emit一次只能傳一層!範例也在Parent component裡接收emit事件,做法一樣,但 "onEmit"沒有再次emit,所以"ctrlObj"是無法接收的。

參考資料

Components Basics
[Vue.js] 父子組件溝通 - $emit / $on

2019年6月10日 星期一

從Blender裡萃取模組資料(9)

從Blender裡萃取模組資料(9)

前言

  最近匯出模組時發現沒 Texture 很不方便,所以就來研究如何取得 Texture 的資料,在五做個紀錄。

內容

  萃取Texture的資料意外的簡單,看以下範例
import bpy
tagObj = bpy.data.objects['Cube']
if tagObj.active_material != None:
    for curTexSlot in tagObj.active_material.texture_slots:
        if curTexSlot == None or curTexSlot.use!=True:
            continue
        #
        if curTexSlot.texture.type != 'IMAGE':
            continue
        #
        print('Slot name:',curTexSlot.name) 
        print('Image name:',curTexSlot.texture.image.name) 
        print('Image width:',curTexSlot.texture.image.size[0])
        print('Image height:',curTexSlot.texture.image.size[1])
        print('Image format:',curTexSlot.texture.image.file_format)
        print('Image path:',curTexSlot.texture.image.filepath_from_user() )
        #Pixel data
        print('Image pixel data amount:',len(curTexSlot.texture.image.pixels) )


範例先檢查是否有 Material 的資料,接著會取 texture_slots,預設會有18個,要注意 slot 可能事空的,範例有過濾該 Texture 是否是使用中,這點可依據需要來取捨。接下來是檢查 Texture 的 type ,範例指讀取 Image 的型態,這個檢查是"必要"的,當 type 是 Image 時, texture.image 才會有資料。資料對應編輯器的顯示可以參考下圖
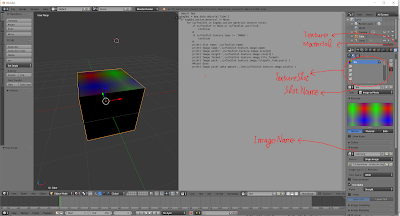
資料對應編輯器的顯示

width 與 height 很直覺的就在 image 的 size, format 會顯示 Blender 支援的圖片格式,範例的話這個數值會是 PNG ,在官網 Blender Documentation Contents 的解說如下

file_format
Format used for re-saving this file

BMP BMP, Output image in bitmap format.
IRIS Iris, Output image in (old!) SGI IRIS format.
PNG PNG, Output image in PNG format.
JPEG JPEG, Output image in JPEG format.
JPEG2000 JPEG 2000, Output image in JPEG 2000 format.
TARGA Targa, Output image in Targa format.
TARGA_RAW Targa Raw, Output image in uncompressed Targa format.
CINEON Cineon, Output image in Cineon format.
DPX DPX, Output image in DPX format.
OPEN_EXR_MULTILAYER OpenEXR MultiLayer, Output image in multilayer OpenEXR format.
OPEN_EXR OpenEXR, Output image in OpenEXR format.
HDR Radiance HDR, Output image in Radiance HDR format.
TIFF TIFF, Output image in TIFF format.
AVI_JPEG AVI JPEG, Output video in AVI JPEG format.
AVI_RAW AVI Raw, Output video in AVI Raw format.
FRAMESERVER Frame Server, Output image to a frameserver.
H264 H.264, Output video in H.264 format.
FFMPEG MPEG, Output video in MPEG format.
THEORA Ogg Theora, Output video in Ogg format.
XVID Xvid, Output video in Xvid format.

路徑的部分透過 filepath_from_user() 來取得,取得後會是"絕對路徑",如果透過 filepath 或 filepath_raw 這兩個 Property取得會得到 Blender定義的路徑(範例的數值是 //color.png ),就我個人的需求來這個是數值目前用不到,所以範例只展示了使用"絕對路徑",有了"絕對路徑"就可以讀檔將檔案的資料直接讀出,這也是匯出會把整張圖匯到檔案理會需要的。最後會看到 pixels 這個 Property ,這個 Property 可以直接取得 Pixel 的資料,資料的型態是 List ,每個資料都是 float ,資料排列的方式是從"左下"座標為基準排列 Piexl 的資料,如果習慣用"左上"排列,記得做上下要顛倒的處理,每個 Pixel 的組成是4個float,依據 RGBA 的順序來排列。 pixels 這個 Property 我最後並沒有用到,就像之前說的,有絕對路徑就符合需求了,單純只是研究用。

2021/03/29 修正:
  由於 Blender 2.8 以後的 Material 有更動,上述方法不再適用,可以參考 從Blender裡萃取模組資料(11)

參考資料

Blender Documentation Contents

相關文章

從Blender裡萃取模組資料(8)

2019年6月3日 星期一

實現計算AABB是否在Frustum裡

實現計算AABB是否在Frustum裡

前言

  最近需要判斷物件的AABB(Axis aligned bounding box)是否在Frustum裡面的計算,在此把學習的過程做個紀錄。

內容

  在Tutorial 16: Frustum Culling裡找到實現的方法,方法是計算AABB的8個頂點是否在Frustum的6個平面裡,Frustum的6個平面看以參考下圖
Frustum的6個平面

平面在程式裡不是紀錄4個頂點,而是記錄成像D3DXPLANE structure一樣的結構,一個法向量(Vector3)加上一個距離,具體的定義如下圖
Plane的定義
接著要計算出點到平面的最短距離,計算的過程比想像的簡單,如下圖
計算點到平面的最短距離
計算式:Nearest distance=Point ● Normal + distance,如果Nearest distance是正值代表點在面的外面,相反的,如果Nearest distance是負值代表點在面的裡面,利用這個原理,將Frustumt拆成6個面,對每個面計算AABB的8個點是否都在該面的裡面,如果有任何一點不符合就代表AABB沒有完整的在Frustum裡。

參考資料

Tutorial 16: Frustum Culling
D3DXPLANE structure